1. Introduction
1.1. What is LVM ?
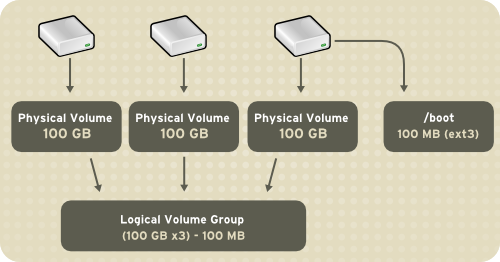
LVM is used to create and handle logical volumes in linux. It is used for replacement of partitioning and it is very smooth compare to partitioning, for example we can reduce a file system to extend another, whatever the position on the disk of these file systems. Without LVM, you will have limitations when trying to extend a partition to the left for example. The great power of LVM is resizing without risk.
If one of the physical volume is dead, it's all the logical volumes in this physical volume which are dead. That's why we could use LVM with RAID.
1.2. Definitions
| Name | Full name | Description |
|---|---|---|
| PV | Physical volume | Hard disk, partitions, RAID volume |
| VG | Volume Group | One or more PV |
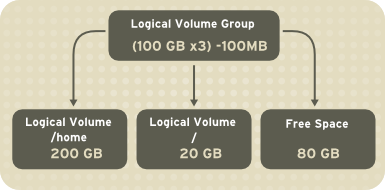
| LV | Logical Volumes | VG are cut into LV, then formatted and mounted in a file system. LV are like partitions |
| FS | File system | This is a way to store information and store them in files. They have a mounted point (like /) and a type (like ext4) |
1.3. Setup
You can list all your hard drive with the following command :
vagrant@lvm:~$ lsblk
NAME   MAJ:MIN RM SIZE RO TYPE MOUNTPOINT
sda      8:0    0  20G  0 disk
└─sda1   8:1    0  20G  0 part /
sdb      8:16   0   5G  0 disk
sdc      8:32   0   5G  0 disk
sdd      8:48   0   5G  0 disk
I have created a virtual machine on debian, and I added 3 virtual hard disks of 5Gio (sdb, sdc, sdd).
Then, I created 2 partitions of 2.5Gio on /dev/sdd (sdd1, sdd2) with fdisk :
sudo fdisk /dev/sdd
And two partitions of 5G on /dev/sdb and /dev/sdc.
Now, here is the state of our VM :
vagrant@lvm:~$ lsblk
NAME   MAJ:MIN RM  SIZE RO TYPE MOUNTPOINT
sda      8:0    0   20G  0 disk
└─sda1   8:1    0   20G  0 part /
sdb      8:16   0    5G  0 disk
└─sdb1   8:17   0    5G  0 part
sdc      8:32   0    5G  0 disk
└─sdc1   8:33   0    5G  0 part
sdd      8:48   0    5G  0 disk
├─sdd1   8:49   0  2.5G  0 part
└─sdd2   8:50   0  2.5G  0 part
Last but not least, you need to install LVM with the following command :
sudo apt install lvm2
2. Physical Volumes (PV)
We can create our first Physical Volumes for the newly created partitions :
sudo pvcreate /dev/sdb1 /dev/sdc1 /dev/sdd1 /dev/sdd2
Then, we can list all physical volumes with sudo pvs :
vagrant@lvm:~$ sudo pvs
  PV         VG Fmt  Attr PSize  PFree
  /dev/sdb1     lvm2 ---  <5.00g <5.00g
  /dev/sdc1     lvm2 ---  <5.00g <5.00g
  /dev/sdd1     lvm2 ---   2.50g  2.50g
  /dev/sdd2     lvm2 ---  <2.50g <2.50g
You can also use these commands :
pvscanpvdisplay
If you want to delete a PV, it is possible with the command pvremove just like pvcreate.
Here is an example :
sudo pvremove /dev/sdd2
Output :
Labels on physical volume "/dev/sdd2" successfully wiped.
Here is the confirmation :
vagrant@lvm:~$ sudo pvs
  PV         VG Fmt  Attr PSize  PFree
  /dev/sdb1     lvm2 ---  <5.00g <5.00g
  /dev/sdc1     lvm2 ---  <5.00g <5.00g
  /dev/sdd1     lvm2 ---   2.50g  2.50g
Now, I can recreate the PV with the following command :
sudo pvcreate /dev/sdd2
3. Volume Groups (VG)
Volume Groups are used to create a pool of storage with your PV.
3.1. Creating and listing VGs
I can create a volume group that includes all our PV with this command :
vagrant@lvm:~$ sudo vgcreate vg1 /dev/sdb1 /dev/sdc1 /dev/sdd1 /dev/sdd2
  Volume group "vg1" successfully created
The first argument is the name of our volume group, and the others are our PV.
Now, I can check my VG with the command vgs, I have this output :
  VG  #PV #LV #SN Attr   VSize  VFree
  vg1   4   0   0 wz--n- 14.98g 14.98g
The VG vg1 appear, so our VG is now created.
Just like for PV, you can use other commands to list all your VG : vgdisplay, vgscan. I let you test these commands.
With the previous commands, you can't see which PV was used to create this new VG. If you want to get this information, you can run this command :
sudo pvdisplay -S vgname=<your_vg_name>
For example, to list all the PV linked to our VG vg1 :
sudo pvdisplay -S vgname=vg1
Output :
  --- Physical volume ---
  PV Name               /dev/sdb1
  VG Name               vg1
  PV Size               <5.00 GiB / not usable 3.00 MiB
  Allocatable           yes
  PE Size               4.00 MiB
  Total PE              1279
  Free PE               1279
  Allocated PE          0
  PV UUID               tabnFz-9Pee-Amdf-3opL-FatS-cBLH-riW4oS

  --- Physical volume ---
  PV Name               /dev/sdc1
  VG Name               vg1
  PV Size               <5.00 GiB / not usable 3.00 MiB
  Allocatable           yes
  PE Size               4.00 MiB
  Total PE              1279
  Free PE               1279
  Allocated PE          0
  PV UUID               h5Yq9X-g8Eg-nufk-ssX6-eLCA-xOAc-6Glvef

  --- Physical volume ---
  PV Name               /dev/sdd1
  VG Name               vg1
  PV Size               2.50 GiB / not usable 4.00 MiB
  Allocatable           yes
  PE Size               4.00 MiB
  Total PE              639
  Free PE               639
  Allocated PE          0
  PV UUID               kpa1w6-435i-cUO4-5LLj-uU0u-sDvO-X0dopb

  --- Physical volume ---
  PV Name               /dev/sdd2
  VG Name               vg1
  PV Size               <2.50 GiB / not usable 3.00 MiB
  Allocatable           yes
  PE Size               4.00 MiB
  Total PE              639
  Free PE               639
  Allocated PE          0
  PV UUID               g0kHPl-jpoN-7V5y-Exla-xW8W-VnVt-C5vkp5
3.2. Extending and reducing a VG
Extending a volume group is the action of adding a new physical volume to our VG.
With our previous manipulations we have one volume group named vg1 containing 4 PV.
Let's reduce this VG by removing the PV /dev/sdd1.
To do this, we are going to use the command below :
sudo vgreduce <vg_name> <pv1> <pv2> ...
Let's do it :
vagrant@lvm:~$ sudo vgreduce vg1 /dev/sdd2
  Removed "/dev/sdd2" from volume group "vg1"
We can take a look about the current state :
vagrant@lvm:~$ sudo pvdisplay -S vgname=vg1
  --- Physical volume ---
  PV Name               /dev/sdb1
  VG Name               vg1
  PV Size               <5.00 GiB / not usable 3.00 MiB
  Allocatable           yes
  PE Size               4.00 MiB
  Total PE              1279
  Free PE               1279
  Allocated PE          0
  PV UUID               tabnFz-9Pee-Amdf-3opL-FatS-cBLH-riW4oS

  --- Physical volume ---
  PV Name               /dev/sdc1
  VG Name               vg1
  PV Size               <5.00 GiB / not usable 3.00 MiB
  Allocatable           yes
  PE Size               4.00 MiB
  Total PE              1279
  Free PE               1279
  Allocated PE          0
  PV UUID               h5Yq9X-g8Eg-nufk-ssX6-eLCA-xOAc-6Glvef

  --- Physical volume ---
  PV Name               /dev/sdd1
  VG Name               vg1
  PV Size               2.50 GiB / not usable 4.00 MiB
  Allocatable           yes
  PE Size               4.00 MiB
  Total PE              639
  Free PE               639
  Allocated PE          0
  PV UUID               kpa1w6-435i-cUO4-5LLj-uU0u-sDvO-X0dopb
You have guessed, you can extend a VG just like this :
sudo vgreduce <vgname> <pv1> <pv2> ....
Now, try to add previously deleted PV before reading the answer.
Answer :
sudo vgextend vg1 /dev/sdd2
Well played !
3.3. Delete a VG
You can delete a VG just like this :
sudo vgremove <vg_name>
For example :
sudo vgremove vg1.
4. Logical Volumes (LV)
Volumes groups are like your hard disks, and your logical volumes are like the partitions on these disks. Indeed, you can format a LV with a file system of your choice and mount it wherever you want.
4.1. Creating a LV
You can create a new logical volume like this :
sudo lvcreate -L <size> -n <lvname> <vgname>
-Lfor the size of the LV. You can use "GB" "MB" and "KB". For example2.5MB.-nis for naming your new LV.
If you want a LV to take 50% of the free space, you can use the -l flag instead of -L. For example :
-l 50%FREE
For example, I create a new LV named lv1 :
vagrant@lvm:~$ sudo lvcreate -L 8GB -n lv1 vg1
  Logical volume "lv1" created.
Check if it is good with :
sudo lvs
And here is the main purpose of LVM. We are able to create a LV of 8GB without any hard disk without any disk of this capacity. Now, we can extend, reduce, delete, format this LV without worrying with about our hard disks or partitions.
When you create a new LV, make sure the VG from you are creating the LV has enough space.
4.2. Operations on LV
4.2.1. Create a file system
Your LV is located here : /dev/<vg_name>/<lv_name>.
Now, we are going to create a new file system on the LV lv1.
You can format it as ext4 :
sudo mkfs.ext4 /dev/vg1/lv1
- Output :
mke2fs 1.46.2 (28-Feb-2021)
Creating filesystem with 2097152 4k blocks and 524288 inodes
Filesystem UUID: 5789707e-a9b9-4714-9d34-a02227c1f5b7
Superblock backups stored on blocks:
        32768, 98304, 163840, 229376, 294912, 819200, 884736, 1605632

Allocating group tables: done
Writing inode tables: done
Creating journal (16384 blocks): done
Writing superblocks and filesystem accounting information: done
Now, you can mount it :
sudo mount -t ext4 /dev/vg1/lv1 /mnt
And use it like for storing file.
4.2.2. Resize (extend or reduce) a LV
You can resize a logical volume with the command lvresize, lvextend or lvreduce.
You must check if the VG has enough free space if you want to extend your LV !
Here is an example :
sudo lvresize -L +2GB vg1/lv1
- Output :
  Size of logical volume vg1/lv1 changed from 8.00 GiB (2048 extents) to 10.00 GiB (2560 extents).
  Logical volume vg1/lv1 successfully resized.
Now, you have resized successfully your LV, then you need to update the filesystem. For ext4, the command are e2fsck and resize2fs :
sudo e2fsck -f /dev/vg1/lv1
then :
sudo resize2fs /dev/vg1/lv1
Now, your file system is resized too, and you can mount it.
5. Snapshot and restoration
The LVM snapshots will help you to backup and restore LV. Later, I will write an article about RAID, which is used for the same purpose.
The command is :
sudo lvcreate -s -n <snap_name> -L <size> <lv_name>
You can then mount the snapshot.
Make sure the corresponding VG has enough space.
Let's mount our LV lv1 and create some files/directory into it :
vagrant@lvm:~$ sudo mkdir -p /mnt/lv1
vagrant@lvm:~$ sudo mount /dev/vg1/lv1 /mnt/lv1
vagrant@lvm:~$ cd /mnt/lv1/
vagrant@lvm:/mnt/lv1$ ls
lost+found  test
vagrant@lvm:/mnt/lv1$ sudo touch file1 file2
vagrant@lvm:/mnt/lv1$ sudo mkdir dir1 dir2 dir3
Now, here is the state of our LV :
vagrant@lvm:/mnt/lv1$ ls -l
total 32
drwxr-xr-x 2 root root  4096 Nov  6 12:00 dir1
drwxr-xr-x 2 root root  4096 Nov  6 12:00 dir2
drwxr-xr-x 2 root root  4096 Nov  6 12:00 dir3
-rw-r--r-- 1 root root     0 Nov  6 12:00 file1
-rw-r--r-- 1 root root     0 Nov  6 12:00 file2
drwx------ 2 root root 16384 Nov  5 18:55 lost+found
drwxr-xr-x 2 root root  4096 Nov  5 18:58 test
We are going to create a snapshot of our LV :
sudo lvcreate -s -n snap_lv1 -L 1GB vg1/lv1
Let's simulate a loss of data in our LV :
sudo rmdir /mnt/lv1/dir2/ && sudo rm /mnt/lv1/file1
Try to restore from the snapshot with lvconvert :
vagrant@lvm:/mnt/lv1$ sudo lvconvert --merge /dev/vg1/snap_lv1
  Delaying merge since origin is open.
  Merging of snapshot vg1/snap_lv1 will occur on next activation of vg1/lv1.
You must unmount the LV and re-activate it. Follow these steps :
sudo umount /mnt/lv1/
Then :
sudo lvchange -an /dev/vg1/lv1
Finally :
sudo lvchange -ay /dev/vg1/lv1
Now you can mount the LV, and surprise ! The deleted file/directory appear ! You've just restored your LV thanks to a snapshot.


